Your Guide to Large File Sharing Free Solutions
Published : Aug 4, 2025
Written by: Madeson Sykes
23 minutes read
We’ve all been there. You hit “send” on an important email, only to be met with that dreaded “Attachment Too Large” error. It’s a universal frustration, but the reason is simple: email was never built to handle the massive files we work with today. Think high-resolution videos, sprawling photo albums, or complex project archives.
Trying to email a huge file is like trying to shove a refrigerator through a mail slot. It’s just not going to work.
Why Sending Large Files Over Email Is a Problem
That “attachment failed” pop-up isn’t a glitch; it’s a core design limitation. Most email providers, from Gmail to Outlook, cap attachments at around 25 MB. This limit isn’t arbitrary. Email servers are designed for speed and efficiency with text, not for hauling massive chunks of data.
When you attach a big file, it’s not just a single transfer. A copy of that file lands on your server, then the recipient’s server, and often several relay servers in between. This clogs the pipes, eats up costly storage, and slows down email delivery for everyone. That’s why trying to send a 100 MB video file is a non-starter. It’s almost guaranteed to bounce back, leaving everyone frustrated.
Beyond the raw technical hurdles, you also run into other headaches like poor security (email isn’t always encrypted) and a complete lack of version control.
The Two Main Paths for Free File Sharing
Thankfully, we have much better ways to handle large file sharing free from the chains of email. The solutions generally fall into two camps, each serving a different purpose. Getting this distinction right is the key to picking the perfect tool for the job.
- Cloud Storage “Lockers”: Think of services like Google Drive or Dropbox as your own personal storage unit in the cloud. You upload files once, and they live there securely until you decide to remove them. This approach is fantastic for long-term projects, team collaboration, and keeping files accessible from anywhere.
- Direct Transfer “Couriers”: On the other hand, platforms like WeTransfer act more like a digital delivery service. You package up your file, and they drop it off for your recipient. The download link is temporary and expires after a while, making this method perfect for quick, one-off transfers where permanent storage isn’t needed.
Let’s break it down even further to help you decide.
Choosing Your Free File Sharing Method
This quick comparison helps illustrate the fundamental differences between the most common methods for sharing large files for free.
| Method | How It Works | Best For | Key Limitation |
|---|---|---|---|
| Cloud Storage | You upload files to your personal account for long-term storage and create shareable links. | Ongoing projects, team collaboration, and having permanent access to your files. | The free storage amount is limited, often around 5-15 GB total. |
| Direct Transfer | You upload a file to a temporary server, and a download link is sent to the recipient. The file is deleted after a set time. | Sending a single large file to one person quickly and without creating an account. | File size is capped (e.g., 2 GB), and the download link expires, usually within a week. |
Ultimately, choosing between a “locker” and a “courier” comes down to one question: Do you need to store this file for a while, or just get it from point A to point B? Your answer will point you to the right solution.
Using Free Cloud Storage to Share and Collaborate
Think of free cloud storage as your own personal, secure locker up in the cloud. Services most of us have heard of, like Google Drive, Dropbox, and OneDrive, have made large file sharing free for hundreds of millions of people. Instead of trying to attach a massive file to an email (and watching it fail), you just upload it to your cloud space and share a simple link.
But this method is about so much more than just sending a single file. It’s built for ongoing collaboration. You get incredible control over who can see your files, who can leave comments, and who can jump in and make edits. This flexibility makes it the perfect solution for everything from high-stakes team projects to just sharing a growing album of family photos with your relatives.
Understanding the Freemium Model
So, how can these powerful services be free? Most of them run on what’s called a “freemium” model. They give you a pretty generous amount of storage for free right out of the gate, hoping that if you ever need more, you’ll love their service enough to upgrade to a paid plan.
Honestly, for most personal use and smaller projects, the free plans are more than enough.
Here’s a quick rundown of what the big players offer on their free tiers:
- Google Drive: Starts you off with a hefty 15 GB of free storage. Just keep in mind this space is shared with your Gmail and Google Photos.
- Dropbox: Offers a smaller 2 GB for free but is famous for its clean interface and rock-solid syncing.
- Microsoft OneDrive: Gives you 5 GB of free storage and, as you’d expect, works seamlessly with Windows and Microsoft 365.
- MEGA: Is a great option if privacy is your top concern, providing a very generous 20 GB of free, encrypted storage.
This freemium approach has completely reshaped the cloud services market. As more of us look for flexible ways to manage our digital lives, these platforms have become indispensable. The global market for these services was projected to hit $611 billion in 2025, a noticeable climb from $570.22 billion in 2024. That kind of growth tells you just how baked-in cloud storage is to everything we do online.
A Step-by-Step Guide to Sharing a Large File
While every service has its own look and feel, the basic steps for sharing a file are pretty much the same everywhere. Let’s walk through it using Google Drive, since it’s a popular choice for large file sharing free of charge.
Step 1: Upload Your File
First things first, log into your Google Drive account. The easiest way to upload is to just drag the file from your desktop and drop it right into the browser window. If you prefer, you can also click the big “+ New” button and choose “File upload” to find it on your computer.
Step 2: Create a Shareable Link
Once your file is uploaded, find it in your Drive and right-click on it. A menu will pop up. From there, select “Share,” and then click “Share” again. This is where the magic happens.
Step 3: Set Permissions and Share
This is the most important part, where you control who gets to do what. You’ll see a pop-up window with a section called “General access.”
By default, Google keeps your file “Restricted,” which means only specific people you invite by email can open it. To share it more broadly, you’ll need to change this setting to “Anyone with the link.”
Now, you decide what power they have:
- Viewer: Can look but can’t touch. They can’t make changes or share it with anyone else.
- Commenter: Perfect for getting feedback. They can view the file and leave comments.
- Editor: The keys to the kingdom. They can make direct changes, approve suggestions, and share the file with others. This is the setting for true collaboration.
Getting these permissions right is a fundamental skill for any team working together from different locations. If you’re managing a distributed team, you might find our guide on remote team collaboration tools helpful.
After choosing the right permission level, just click the “Copy link” button. You can now paste that link in an email, a Slack message, or anywhere else. Anyone who clicks it can access your file instantly, and they don’t even need a Google account to see it.
Sending Files Instantly with Transfer Services
Sometimes you don’t need a permanent digital locker; you just need a digital courier. What if you need to send a single large file right now, without the fuss of signing up for a new account or managing long-term storage? This is where dedicated file transfer platforms truly shine.
Think of services like WeTransfer or SendGB as a specialized delivery service for your files. You hand them your package, give them the destination address (your recipient’s email), and they handle the rest. Job done. It’s a beautifully simple solution for large file sharing free of complexity.
This approach is all about pure convenience. It’s the perfect method for sending a finished video to a client, sharing a presentation deck with a colleague, or getting a high-resolution photo album to a friend without cluttering up anyone’s cloud storage.
How Transfer Services Work: A WeTransfer Example
The real genius of these services is their simplicity. There’s no software to install and, for basic sends, you often don’t even need an account. The entire process is built for speed, getting your file from your computer to your recipient’s inbox in just a few clicks. Here’s a step-by-step example using WeTransfer:
-
Step 1: Upload Your File: Go to the WeTransfer website. The upload box is front and center. Click “Upload files” to select the large video or project folder from your computer. If you have multiple files, it’s best to group them into a single folder. You can learn how to upload a zip file in our other guide.
-
Step 2: Enter Recipient Information: In the box labeled “Email to,” type the email address of the person you’re sending the file to. In the “Your email” box, type your own so they know who it’s from. You can also add a short note in the “Message” field, like “Here is the final cut of the promo video!”
-
Step 3: Hit Send: Click the “Transfer” button. WeTransfer will upload the file and send an email to your recipient with a unique download link. They just have to click the link in the email to download the file directly to their computer.
That’s really all there is to it. No permissions to manage, no accounts to create. Just a quick, effective transfer.
Understanding the Free Tier Rules
Like their cloud storage cousins, these transfer services typically run on a freemium model. The free tier is surprisingly powerful but comes with a few clear rules and limitations you need to be aware of. These limits help keep the service fast and available for everyone.
For one-off sends, these limitations are rarely an issue. They are designed to accommodate the most common use cases, like sending a design proof or a short video clip, without costing you a penny.
Here are the typical rules of the road for a free plan:
- File Size Caps: Most free services cap the size of each transfer. A common limit is 2 GB per transfer, which is plenty for most documents, presentations, and even shorter HD videos.
- Link Expiration: This is a big one. The download link isn’t forever. It will automatically expire after a set time, usually 7 days. This highlights the key difference from cloud storage—it’s built for immediate delivery, not long-term access.
- Transfer Limits: Some services might limit how many transfers you can send in a day or how much total data you can use. For casual use, however, you’re not likely to bump into these ceilings.
This model of temporary, direct sending is what makes these platforms such a vital tool for large file sharing free of charge, especially when speed and simplicity are what you need most.
How Peer-to-Peer (P2P) Sharing Works
When you’re staring down a mountain of data—think terabytes of raw video footage or massive scientific datasets—even the best cloud services can start to buckle under the weight. This is where a different, more direct approach really shines, offering a way to share enormous files for free, without ever touching a third-party server. This method is called Peer-to-Peer (P2P) sharing.
Think of it like creating a secure, private tunnel that connects your computer directly to your recipient’s. Instead of the typical process of uploading your file to a central server and having them download it from there, the file travels straight from your machine to theirs. It’s a digital handshake that establishes a direct connection, completely bypassing the middleman.
The No-Server Advantage
The beauty of P2P is that your data stays entirely under your control. It never gets uploaded or stored on a company’s server, which is a huge win for both privacy and security. If you’re working with sensitive client information, confidential projects, or proprietary research, this direct-transfer model gives you a level of confidence that cloud solutions often can’t provide.
This direct connection also means there are virtually no file size limits. You aren’t boxed in by a free account’s storage quota, so sending a 100 GB file is just as feasible as sending a 1 GB file. The only real constraints are your internet connection speed and how much storage space your recipient has.
The heart of P2P is decentralization. Instead of a central server managing everything (like a hub with spokes), P2P creates a network where every user, or “peer,” can talk directly to every other peer. This makes the whole system incredibly robust and efficient for moving huge amounts of data.
P2P in Action: A Step-by-Step Guide with Resilio Sync
While the technology powering it is complex, using a modern P2P tool is surprisingly simple. Services like Resilio Sync have streamlined the experience. Here’s a practical step-by-step guide on how it usually works:
-
Step 1: Install and Select Your File: First, both you and your recipient need to install the Resilio Sync app. Once installed, open the app and click the ‘+’ button to add a folder. Navigate to the folder containing the massive file you want to send. For instance, select the “Documentary-Raw-Footage” folder on your hard drive.
-
Step 2: Generate a Secure Link: After selecting the folder, Resilio will present you with sharing options. Choose to generate a “Link.” You can often set permissions here, such as read-only or read-write access, and set a link expiration time for added security.
-
Step 3: Send the Link to Your Recipient: Copy the unique, secure link provided by the app. Send this link to your colleague via a secure channel like an encrypted messaging app or email. This link is the key that authorizes their computer to connect directly to yours.
-
Step 4: The Recipient Accepts and Downloads: Your colleague clicks the link, and their Resilio Sync app will open and ask to confirm adding the folder. Once they accept, the transfer begins. The data flows directly from your computer to theirs, encrypted along the way. Both computers need to be online for the transfer to proceed; if one disconnects, the transfer pauses and resumes automatically when both are back online.
For anyone needing to move massive datasets or highly sensitive projects, this direct pathway is the ultimate solution for keeping data completely off third-party servers.
Keeping Your Shared Files Secure

Sharing a file is easy. Sharing it securely? That takes a little more thought. When you’re using any service for large file sharing free of cost, you’re the first and most important line of defense for your own data. One wrong click can turn a convenient shortcut into a major headache, exposing information you’d rather keep private.
This isn’t just fear-mongering; it’s a real-world problem rooted in everyday habits. We’ve all done it—shot a work file over to a personal email or used a personal cloud account in a pinch. The numbers back this up. An eye-opening 63% of employees admit to using personal email for sensitive work documents. Even more staggering, 56% use personal file-sharing accounts for their jobs, often flying under the radar of company policy. You can see the full findings on these transfer trends at transferchain.io.
Those statistics really drive home why a few good security habits are non-negotiable. Let’s walk through a practical checklist to keep your files safe and sound.
Your Essential Security Checklist: A Practical Example
Think of these as your pre-flight check before hitting “send.” Let’s say you’re a freelance designer sending a draft logo concept to a client. Here’s how you’d apply the checklist:
-
Password-Protect the Link: The logo is confidential intellectual property. When you generate the share link in your cloud service, look for an option to “Add password” or “Require password.” Create a strong, unique password (e.g., “ClientLogo2024!”) and send it to your client in a separate message or text for added security.
-
Set an Expiration Date: This is just a draft, not the final version. Set the share link to expire in 48 hours. This gives the client enough time to review but prevents the link from floating around indefinitely.
-
Use a Private (Restricted) Link: Instead of creating a link that “anyone” can view, use the “Restricted” setting. Add your client’s specific email address to the share list. This ensures only they can access the file after logging in, even if they accidentally forward the link email to someone else.
Here’s a simple rule of thumb: If you need to control who sees the file, use a private link and add their email addresses directly. A public link is for things you want the world to see, like a marketing flyer or a public announcement.
Encryption and Network Risks: What You Need to Know
Two other concepts are crucial for truly secure file sharing: encryption and network safety.
What Is End-to-End Encryption?
Imagine you’re sending a secret message. A standard file transfer is like writing it on a postcard—the mail carrier, the post office, anyone handling it can read it.
End-to-end encryption is like putting that message in a locked box that only your recipient has the key to. The delivery service (in this case, the file-sharing platform) can transport the box, but they can’t peek inside. Your data gets scrambled into unreadable code on your device and is only unscrambled on the recipient’s end.
The Danger of Public Wi-Fi
Never, ever transfer sensitive files while sipping a latte on a café’s public Wi-Fi. The same goes for airports, hotels, and libraries. These networks are notoriously insecure, making it frighteningly easy for a snooper on the same network to intercept the data flowing between your device and the router.
Always wait until you’re on a trusted, password-protected network, like your home or office Wi-Fi.
Mastering these habits is the key to sharing files confidently and responsibly. For an even deeper dive into protecting your digital footprint, be sure to review our comprehensive website security checklist.
How to Choose the Right File Sharing Tool
With so many free options out there, picking the right service for sending large files can feel a bit like analysis paralysis. But it doesn’t have to be complicated. The secret isn’t finding one “perfect” tool for everything, but rather the right tool for the job you need to do right now.
By asking a few simple questions, you can cut through the noise and land on the best solution for your specific needs. It’s all about focusing on what truly matters for this particular transfer.
Four Key Questions to Ask Yourself
Before you drag and drop that file, take a quick pause and run through this mental checklist. Your answers will guide you to the ideal method, whether that’s a cloud storage platform, a direct transfer service, or even a peer-to-peer connection.
-
How big is the file, really? There’s a world of difference between a 500 MB report and a massive 30 GB video project. For files under 2 GB, most direct transfer services are a fantastic, no-fuss option. Once you start getting into the multi-gigabyte range, you’ll want to look at cloud storage or P2P.
-
How often are you sharing? Is this a one-and-done deal, or are you starting a project that needs ongoing collaboration? Direct transfer services are built for quick, temporary sends. For anything that requires long-term access or teamwork, cloud storage is your best friend.
-
How sensitive is the data? Let’s be honest, sending vacation photos carries a lot less risk than sharing a confidential business proposal. If your files contain sensitive information, you absolutely need to prioritize tools with strong security features like end-to-end encryption, password protection, and expiring links.
-
How tech-savvy is your recipient? The whole point is to make their life easier, not harder. A simple download link from a service like WeTransfer or Smash is about as straightforward as it gets. P2P transfers are incredibly powerful, but they might require a little more coordination from the person on the other end.
This handy visual breaks down the decision based on how big your file is and how secure it needs to be.
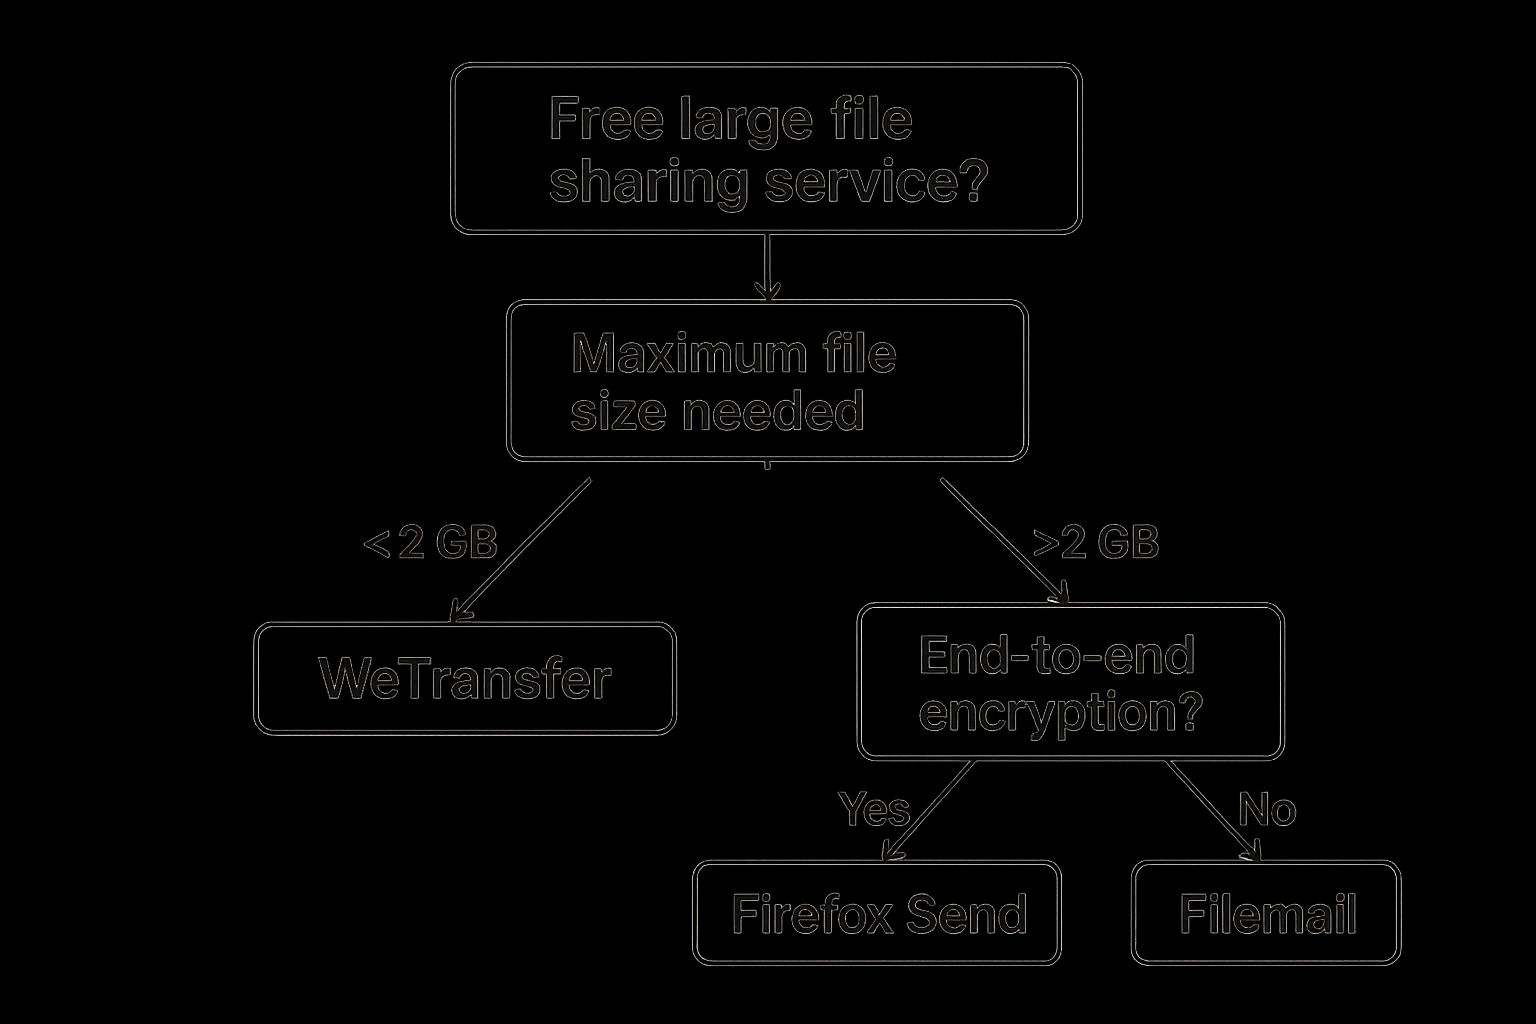
As you can see, for smaller, non-sensitive files, you’ve got plenty of great options. But as files get bigger or require more security, your choices become more specialized.
This growing need for secure, controlled solutions is a huge trend. The managed file transfer (MFT) market was valued at $2.1 billion in 2024, and it’s growing fast as more companies look for ways to defend against cyber threats and meet strict compliance rules. You can discover more about the growth of the MFT market and what’s driving it.
To put it simply: Need to co-edit a 500 MB report with your team? Cloud storage is the clear winner. Need to send a 30 GB video file just once to a trusted colleague? P2P is your best bet.
To make it even easier, I’ve put together a quick reference guide. Just find your scenario in the table below, and you’ll have your answer.
Your Scenario-Based Tool Selection Guide
| If Your Main Need Is… | Your Best Free Option Is… | Why It Works Best |
|---|---|---|
| Simplicity and Speed | Direct Transfer Service (WeTransfer, Smash) | Easiest for both sender and receiver. No accounts needed, just a simple upload and a download link. |
| Ongoing Collaboration | Cloud Storage (Google Drive, Dropbox) | Perfect for shared access, version control, and team editing. The files stay put for as long as you need them. |
| Maximum Security | Encrypted Service (Wormhole, Tresorit Send) | Prioritizes privacy with end-to-end encryption, ensuring only you and your recipient can see the files. |
| Sending Huge Files | P2P Transfer (Resilio Sync) | Bypasses server limits by sending the file directly from your computer to theirs, making it ideal for massive datasets. |
Think of this table as your cheat sheet. By matching your task to the right tool, you can be confident you’re making the smart choice every single time.
Your Top Questions About Free File Sharing, Answered
Jumping into the world of free file sharing can definitely bring up a few questions. It’s smart to be curious, especially when you’re dealing with important files. Let’s tackle some of the most common things people wonder about so you can share your large files with confidence.
Can I Really Share Huge Files Straight From My Phone for Free?
You bet. Gone are the days of being chained to a desktop. Most of the big cloud players, like Google Drive and Dropbox, have fantastic mobile apps for both iPhones and Androids. The whole process is surprisingly simple.
Here’s a practical step-by-step guide for sharing from your phone using the Google Drive app:
- Step 1: Open the Google Drive app on your phone.
- Step 2: Tap the circular
+button in the bottom-right corner and select “Upload.” - Step 3: Browse your phone’s files or photo library and select the large video or PDF you want to share. Wait for it to finish uploading.
- Step 4: Find the newly uploaded file in your Drive, tap the three-dot menu icon next to it, and select “Share.”
- Step 5: Tap on “Not shared” at the bottom, change the link settings to “Anyone with the link,” and set the role to “Viewer.”
- Step 6: Tap the link icon in the top-right corner to copy the shareable link. You can now paste it into a text message, email, or messaging app.
Even many of the direct transfer services have slick, mobile-friendly websites, so you can send large files from pretty much anywhere.
What’s the Biggest File I Can Possibly Send for Free?
That’s the million-dollar question, and the answer is: it depends entirely on the tool you pick. There’s no single “max size” across the board.
- Cloud Storage: Your limit is usually your total storage space. For example, with Google Drive’s 15 GB of free space, you could share one massive 15 GB file if your drive is otherwise empty.
- Direct Transfer Services: These services focus on the transfer itself and have per-transfer limits. The free version of WeTransfer caps you at 2 GB for each transfer you send.
- P2P Tools: When you need to send something truly enormous, Peer-to-Peer (P2P) is in a league of its own. Since the file goes directly from your computer to theirs without a middleman server, there’s no real file size limit.
Is It Actually Safe to Use Free Services for Sensitive Files?
It can be, but you have to be smart about it. You can’t just click “send” and hope for the best with things like financial records or confidential contracts. A little due diligence goes a long way.
If you’re handling sensitive info, always take these precautions:
- Pick a service that explicitly mentions encryption.
- Add a password to the download link. This is a crucial extra layer of security.
- Set an expiration date for the link—even just 24 hours is enough to dramatically reduce risk.
One piece of hard-won advice: Never, ever transfer sensitive data over public Wi-Fi. That coffee shop network is a playground for anyone looking to snoop. For top-tier security, your best bets are P2P tools or services that boast true end-to-end encryption.
When you’re ready for a file-sharing tool that nails speed, security, and ease of use, check out Href.sh. It’s built for everything from personal backups to professional teamwork, handling huge files and giving you detailed analytics. See how simple instant, reliable sharing can be at https://href.sh.